


Using Virtual Reality to Augment Light Drawing

Just because you can do something doesn’t mean that you should. But sometimes, like in the case of combining virtual reality and light painting, it’s just fun!
My Own Introduction to Virtual Reality
I have had a virtual reality system for almost three years. I had been introduced to a guy by the name of David Romero, as I was looking to add something neat to a party I was throwing. He started by putting me into a program called Tilt Brush, an immersive 3D drawing program. I was only 20 seconds into that experience before I decided that I needed to get an HTC Vive system.
Anyone reading this understands that there is something magical about light painting. There’s also something magical about waving your hands in the air, with VR controllers, and actually seeing the marks you just left. In those first 20 seconds, walking around my “in the air” creation, viewing it from other angles tapped into the deepest part of my childish glee.
Tilt Brush lets you choose different colors, different brushes, and different effects that are not possible in traditional illustration. In a way, it’s an interesting way to practice for light drawing. You get to make similar movements while actually seeing the paths you’re drawing.
VR Systems
Although it rapidly became the leader in home VR, the HTC Vive was not the first widespread consumer headset. Two forms of the Oculus Rift came out before the Vive. All of these systems were powerful, required dedicated sensors, and required a wired connection to a computer. These outside-in tracking systems offered six degrees of freedom (6dof: left, right, front, back, up, down) and were truly immersive. If you moved in virtual reality, you moved inside your environment. 360 videos are an exception, as if you physically move, the video moves with you.
This was followed by things like Samsung’s Gear VR, which would let you do virtual reality and 360 videos straight from your mobile phone. Oculus released a new product, Oculus Go, that had a built in processor and didn’t require that you even put your phone in. These systems had three degrees of freedom (3dof); while you could turn your head and look all around, you were unable to move within a VR environment by simply moving your body. If you moved your body physically to the side, the whole VR world would drift along with you. This is not a good experience, but if you don’t move then the 3dof headsets still have some uses.
Portable VR Systems
Several self-contained 6dof systems were in development. These ditched external sensors and used inside-out tracking. This type of headset relied largely on computer vision algorithms, and they eliminated the need for the dedicated sensors, while still offering wireless and sensorless 6dof. These headsets have multiple cameras built into the front that analyze your position and track you in VR accordingly. While others have released with modest success, the newly-released Oculus Quest sold out almost immediately and instantly became an Amazon top 10 seller. Quest was going to be a game-changer. Lacking the requirement for dedicated sensors, you could take this virtual reality headset anywhere and set up your “guardian zone”. This is an area it can track you in, and it will keep you safe, preventing you from running into things!

Virtual Reality Meets Light Painting
A couple weeks ago I was talking with Dennis Ryu Bar, from Germany. He knew I had experience with virtual reality and wanted an opinion on the Oculus Quest. I shared what I knew, and a week or so later he told me he had ordered one.
Dennis likes to tinker and to create, and the next time we spoke the conversation turned to the possibility of using VR somehow in light painting. This is something I’d considered in the past, but had discarded due to the need for wired headsets and fixed tracking sensors. We discussed a few things and wrapped up. Dennis and I both left with the gears turning, specifically thinking about Tilt Brush, and how we could leverage that.
We spoke again about the possibility of using the Quest in the dark. These devices rely on computer vision instead of infrared tracking. This, however, means that the cameras have to be able to capture reasonable images in order to process position at all. Sadly, the Quest would not be able to work if no light was present. The conditions we, as light painters, require for our art are the very conditions that the Quest fails to work in.
Using Science To Win
Dennis and I wondered if the Quest would work in a dark environment if it was flooded infrared light. This wouldn’t impact typical photographs at all. All modern cameras have infrared-blocking filters, unless they have been intentionally modified to have it removed or altered. Given that the Quest was brand new, we weren’t sure we’d get an answer to that. After some quick YouTube searching, Dennis found someone who had tested exactly that. We got the answer we were looking for: yes!
Dennis received his Quest, and I was able to find the only remaining Quest for sale in Colorado. These were already massively back-ordered, so this was good fortune indeed! A couple days later, Kirk Edwards was visiting Denver, and the Colorado Light Painting group was having a meetup. I decided this would be a good opportunity to test a shot I had in mind.
How My Test Went Down
Everyone arrived for the meetup, and eventually started setting up in the “Black Cave”, my basement shooting zone. While that was happening I popped into Tilt Brush upstairs and quickly drew out an image. Although Tilt Brush is built for 3D drawing, I chose to draw on a plane that would eventually be flat in front of the camera. Drawing is hard with lights, but it’s a lot easier when you can see the shapes you’re making. That said, I’m not that great at drawing even when I can see!
Here is the shape I drew in Tilt Brush:

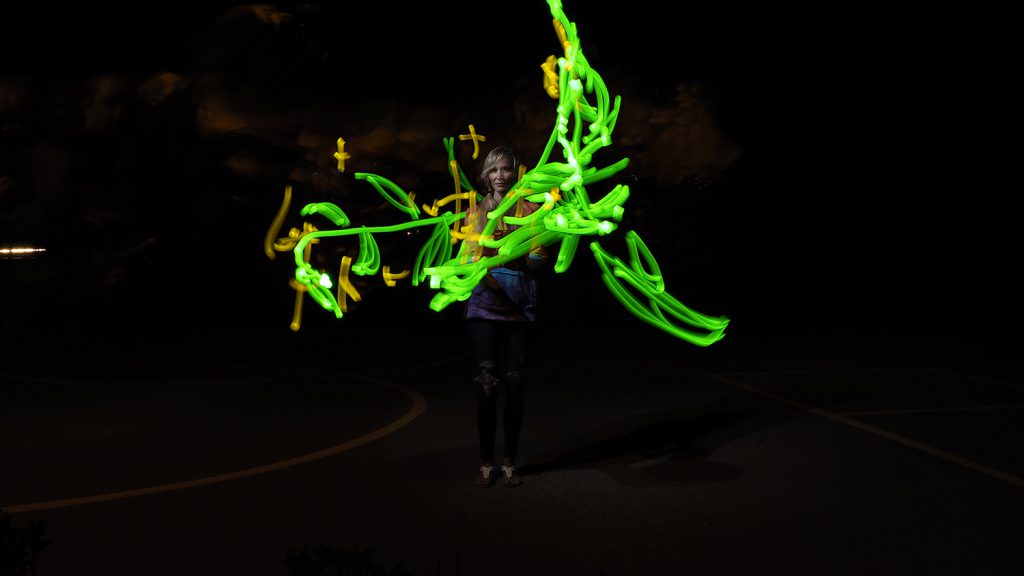
I took the system downstairs, and when the time arose for a new shot, I asked for help in creating this. Karen Conrad supplied a UV flash on Tanya Shirell. Tanya was sort of doing an Alice in Wonderland pose, with a tea cup. I asked Kirk Edwards to add some EL-wire smoke. I set up my infrared flood lights, and easily calibrated the play space. Then came the fun part as I put on the VR headset…
Light Painting In Virtual Reality

I was now standing in a room with ten friends, but all I could see was the virtual reality experience. Tilt Brush was in front of me and I positioned the image just behind where Tanya was set up to model. I had Kirk tape a fishing bobber light (thanks Brian Matthew Hart!) to the end of one of the VR controllers. These lights are designed to be “always on” so I would have to cover it with my left hand in order to “turn it off” for the camera.
The major upside to using this sort of light was that, despite being in VR and not being able to see anything at all in the real world, I had a light that would faithfully follow the controller that I could see in VR. Now I could essentially trace the image that I had already created, in VR, and the light would follow to the camera in the real world. I chose to use a fat brush in VR to additionally trace all of the lines I’d already drawn, in order to keep track. This is what I saw inside VR:
Shooting the Mushroom
After I drew all of the white lines, I covered the light with my hand and moved to the edge of the VR space. Kirk swapped out the light for a red one. I covered it, then returned to where my VR drawing was and drew the red lines. I repeated the process for the yellow lines, and the green, and then it was done.
Excited, nervous, apprehensive, I closed my shutter and this is what I saw:

I was able to precisely position each color into the image despite walking all over the place, and completely out of the scene in order to change light colors. Look at the circles inside the mushrooms. I completed each color in its entirety, one at a time, then left the frame and returned, and was able to line up each color with amazing accuracy. (note: none of this means my drawing was good, only that I got exactly what I was trying to, per my own drawing ability!!)
Back to Dennis
The following morning I shared my creation with Dennis. He too had explored the same that night. He had created a more involved way to attach a light to his controller. This is what his setup looked like, and his first image:

The next time we spoke, Dennis had 3D printed a way to better attach a light to his controller. (Note to self: time to get a 3D printer!!)

He and I had both succeeded in our proof of concept shots on the same night! Here are a couple more he did a few days later:

Taking it up a Notch
Next, I tried to go big and had Reagan Nguyen (previously “Nancy”) draw something with depth and multiple colors. For a second option, I added some additional lines because I wanted to test with more complexity. I met up with a friend and tried to execute it, outside. This time I had a different setup using LightPaintingBrushes.com opaque light writers.

The first challenge we had was finding a location that was dark enough to light paint in, yet light enough that the computer vision cameras could work. After a few “too dark” aborted attempts, we settled on a location near a school. The plan was to set up in an area that had an overhead light, but to point the camera away into the dark. I picked up my mostly-unused Olympus and decided to give this a go with live composite. That part of the plan more or less worked.

Too Complex
What didn’t work very well was the complexity of the shot. There were two factors in play here. One was that the darkness was messing a little bit with the computer vision and the picture jumped around a little bit. In addition to being disconcerting, it also meant that the reference image inside was shifting.
OLYMPUS DIGITAL CAMERA
The other factor was that I made the image far too complex. I had the lines for reference but when I had traced them in VR, the resulting image was utterly horrible. Lines overlapped, in my attempt at depth, and instead of a satisfying test it was stressful and sad. Oh well, not every time is a win, and I got to spend time with my friend and her daughters. The image above is not even the one I made worse with the extra lines!!
Removing Walls
Learning from that experience I decided to return to a flat image and I decided that this time I wanted to draw using a sparkler. While there is no on/off switch on a sparkler, that can also be an advantage with this technique in that there isn’t any need to swap out lights with a device over your face 🙂 I wanted to go big, to test the limits of what could be done with the Quest.

Stepping into Tilt Brush I made a reference mark in the air, about six feet high. I reached out to either side and made marks there as well, six feet wide. Moving around inside Tilt Brush I made additional marks at six foot intervals. Soon I had a space that was about 30 feet wide. My canvas was to be a very large, vertical plane. I drew out a bird shape. In Tilt Brush I was able to draw in several steps, ignoring the single streak that I’d have to do with the sparkler. I had to draw in a way that the single line would work, but I could assemble it bit by bit. Finally I was ready and I set out with Reagan and another friend, Sammi.
Shooting The Bird

We ended up at a tennis court that can have overhead lights turned on for short periods of time. The ground was flat, it would have good reference lines on the ground for the computer vision, and it would have enough light to work. Again, we planned to shoot away from the light, into darkness. We spent some time trying to find the darkest spot that the tracking could also work, then I went back to my Nikon, and set up the tripod. Switching the aperture to f13, ISO 100, we were ready . We lit the sparkler, opened the shutter, and 41 seconds later we captured this:

At 25 or so feet across, this was my largest light drawing, and it turned out really well! Light painters usually use their own body as a reference for drawing, but for a drawing of this scale that wasn’t possible. The symmetry was extremely satisfying, and the alignment of all of the pieces was amazingly precise. I did two more attempts, but the first was the best. On the second attempt I slowed down, trying to make the sparkler brighter, but didn’t have enough sparkler to finish the image. For the third attempt, we changed angles and one of the wings ended up out of frame.
Conclusion – Virtual Reality has Potential!
Light drawing with virtual-reality-as-a-reference is definitely a neat experience. Waving lights around when you can’t even see the real world, and creating something visually satisfying, was a blast. The images are reproducible, opening the door to more complicated stop-motion animations or rotational shots.
This technique won’t be for everyone, but I intend to use it and see what kinds of creations might be within reach to me, where once they weren’t.
“I think this is an amazing technology that can really benefit our art and has a lot of possibilities we probably haven’t thought about yet.” – Dennis Ryu Bar

