


Light Painting DIY – The Backlight Scanner Tutorial
Light Painting DIY – The Backlight Scanner Tutorial
(Des sous-titres en français sont disponibles)
What is that ?
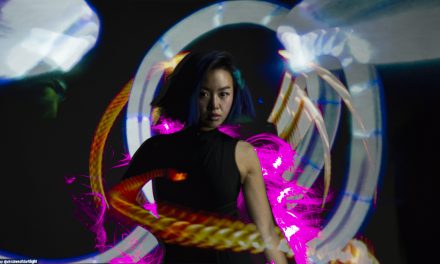
The backlight scanner is light modifier to mount on a flashlight. Its main usage is to hide the light source from the camera while doing a backlight. But if the light source is moved from the background towards the camera during the exposure, it will “scan” the scene with the light and create a “path of light” in the scene. The scene is then going to be lighted with a soft and strange light which seems to be generated by the scene itself, while preserving the benefits of the backlight: textures and shapes are highlighted.
Who is it for ?
It’s for everybody who has to light a scene in low light or pitch black condition. It could be used for urban exploration, nightscape, and -of course- light painting.
The tool has been designed to be cheap, easy to build and -most important- easy to use.
There are plenty of ways to light a location, but -as long as I know- they all require practice and experience. Practice sounds like fun for the light painters, but it might be frustrating for the other types of photographers -who may not enjoy as much as we do to have to light the place 20 times in a row to get a single picture-. And even for the light painters: they tend to create amazing light shapes and beautiful effects, but they may find boring the lighting of the surrounding to include their creations in the space. It’s not always the blue hour (hi, Eric :)) or the full moon (hi, Denis :)).
So this tool is made for everyone. If you’re able to walk from the background towards the camera while holding a flashlight, during a long exposure, you’re qualified.
How to use it?
It’s really simple:
- I go to the background,
- I trigger the camera on,
- I point the tool towards the camera,
- turn the flashlight on,
- and I walk towards the camera. As long as the tool is directed to the camera, everything is perfect.
- when I reach the camera, I turn the light off.
If you’re a light painter, the case is ready and waiting for your light jewels to be added. And if you’re not a light painter, you could stop the exposure and then now you are a light painter, as you have moved intentionally a light source during a long exposure. Welcome aboard. 🙂
Bonus: as it lights the path in front of the tool, it’s really easy to move safely, even on a rough or overstocked terrains. No risk to fall in a pit in the dark!
Can I plug the tool to my Universal Connector?
Well…
Yes.
No.
Maybe.
Technically, yes, you could plug the tool on a Universal Connector (or on a connector from another brand). But these connectors tend to have a small circle for the output; so they mostly keep only the central part of the light beam which is getting out of the flashlight. Which is perfect for the blades, fibers, swords, tubes, etc. But with the backlight scanner, the sides of the light beam are really useful (the central part of the beam is kind of blocked/bounced). A flashlight with a wide beam is perfect for this tool, in general. So, my best advice would be “try and let us know”. 🙂
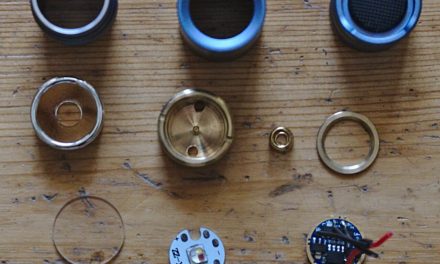
How to build one?
There are plenty of methods to build the tool. I’ve (quickly) explained one method in the video. It’s far to be the best one, but it’s cheap and efficient. So if you find a better method, let us know. 🙂
Between the ghetto version with cardboard/kitchen aluminium foil/tape and the limited edition in Titanium/Swarovski/Dodo leather, everything is possible.
But if you have access to a 3D printer, you’re a lucky guy/girl.
The links between the front and the back parts should not block too much light, or they will project shadows on the sides. That’s why I’ve made them with a very thin width in the light axis.
The trickiest part is to evaluate the distance between the front and the back parts. If it’s too short, then no direct light from the flashlight is going to get out of tool directly, you will only have bounced light. If it’s too long, then it will become very hard to stay hidden behind the front part. So it’s a balance to find between how large is the beam of your flashlight and how far away the source should be from the front part to have some light going out of the tool directly.
How is a creative tool?
It’s not. No tool is creative, people are. The light painting community is known for bringing any tool to the next level very fast and I’m sure I will be amazed by the crazy creations which could derive from this.
Do I look like a weirdo ghost buster while holding that tool?
Definitely.
But don’t worry, I’m wearing my aluminium foil hat, so these ghosts cannot control my mind anymore…
Have fun.


very informative, great tool info! Thanks
Thanks 🙂
Excellent video and an excellent tool, great stuff Pala, Thanks very much xxx
Thanks again Phill 🙂