


Infrared Light Painting – Modifying a D70 for infrared
Infrared Light Painting
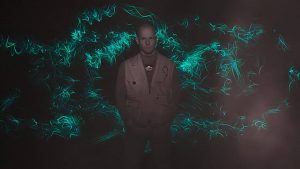
It was a tremendous pleasure to welcome one of the most innovative and creative Lightpainters as a guest of our event “Lightpainters United” in Berlin; Dan Chick from Denver (USA). After doing a bit of research he seems to be the only one who uses an infrared camera in light painting. Until now, anyway 😉 After watching him doing these pictures, and especially after admiring the results, we decided to give infrared light painting a try. I start a research of infrared photography on the Internet. I found quite a lot of confusing and contradictory contributions from various “experts”. I decided to try it myself. I hope to break things down a bit more easy with this article.
Full spectrum vs infrared
One of the first questions is full spectrum or only infrared. This article is mostly about full spectrum Light Painting. The camera captures the full visible light spectrum and invisible infrared light. To capture only infrared light in (part of) the Light Painting a IR-Filter is needed. This filter blocks visible light, only infrared light hits the sensor. Another opportunity is to convert the camera in a pure infrared camera. In this case, the filter is mounted in front of the sensor. The camera does not take visible light anymore.
Step 1:
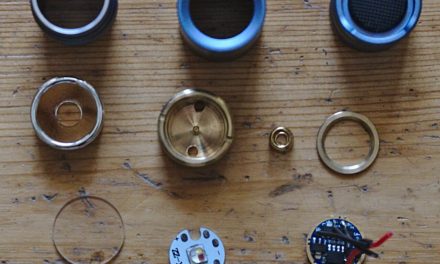
The camera has to be modified in a way that the sensor is able to catch the infrared light. The IR filter installed over the sensor has to be removed. The filter blocks light with wavelengths more than 700nM. So I took the Nikon D70 (my first DSLR), which had been unused for a long time, and unscrewed the housing. First of all, the mirror should be folded up and the shutter opened in order to avoid damage to these sensitive parts during the conversion. For this, against Nikon’s recommendation, I had the camera, on manual mode and “bulb”, the shutter button pressed and the battery removed. Mirror and shutter work only electrically, so it will remain in this position as long as the camera is without electricity (battery). The rear wall is fixed to the housing with 4 small cross-slotted screws. You need a GOOD! PH00 screwdriver for this purpose. Then loosen the 4 cross-slotted screws of the metal plate the sensor is attached. And it looks like the picture.
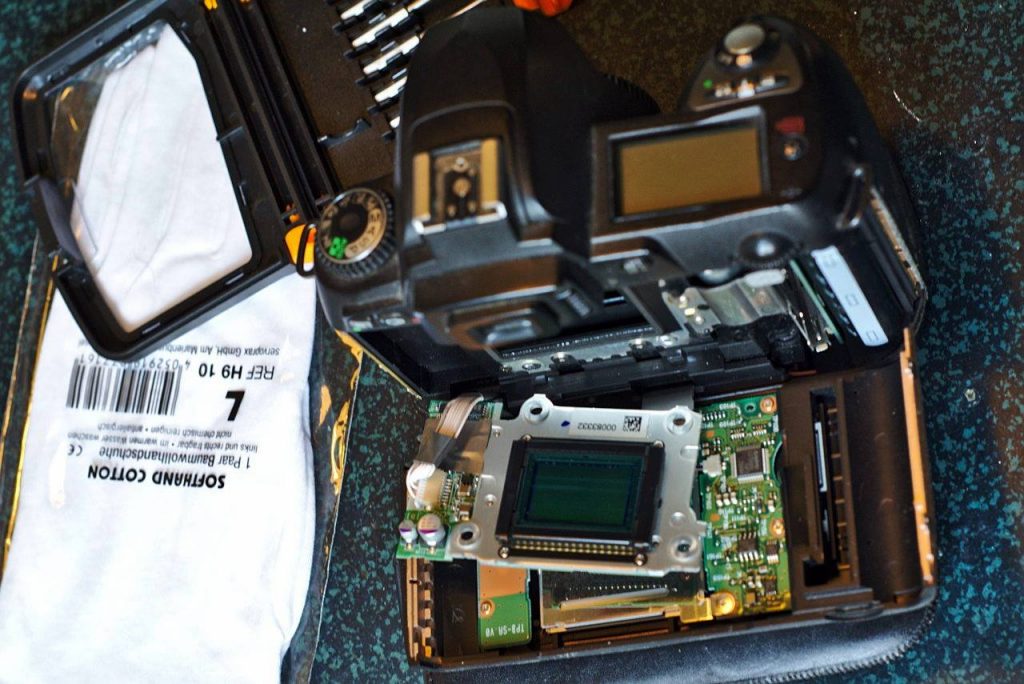
I then removed the 4 smaller cross-slotted screws of the black frame at the sensor. For this, you need a screwdriver of size PH000, of course, at least as good as the PH00. This frame holds the protective glass and the green IR blocking filter in front of the sensor. My idea was to remove only the IR filter. In my case, both glasses were somehow glued. I could not separate the two glasses, so both went to the trashcan…
For this work, you should wear lint-free cotton gloves and make sure you do not eat any fat sausages.. 😛 Fat spots on the sensor are not good. Also, needless to say, if you want to keep the option of putting back the camera into its original state, don’t throw the filter away. Pack the part safely and above all dustproof it. Most IR conversion sites recommend replacing this IR filter with a piece of clear glass (for a full-spectrum conversion) or with an IR-pass filter (for fixed IR wavelength conversion).
I had to reassemble the camera as soon as possible so that the sensor is not exposed to dust longer than needed.
The Nikon D70 is very easy to rebuild, no cable connections need to be solved. For most cameras, these filigree flat cables are located on the printed circuit board at the back top and bottom has to be removed. When loosening and connecting during the conversion, something can go wrong. But you do not necessarily have to do it yourself. There are several service providers that convert almost every camera. The prices are between 150 and 250 €. You get a guarantee for the conversion.
I would probably not buy a new camera now to rebuild it to infrared. But buying a used entry-level DSLR for the conversion on eBay is certainly worth considering.
Step 2:
Test.
The state the camera is now, it takes the full visible light spectrum and additional infrared light. The picture of our cat Leo looks almost like a normal photo. 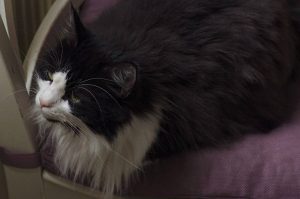 And if you do not know that the pillow on the chair does not have this disgusting color, it is hardly unlikely to understand the difference. I corrected the white balance of the RAW image in post, because full-spectrum images tend to have a red tint.
Infrared light is refracted differently from the lens than visible light. For this reason, both the autofocus and the manual focusing by the viewfinder no longer work. The focus is always a bit too far forward. You could focus quite comfortably over Live-View … if the D70 would have this feature. Some cameras do better in this regard than others. Dan’s Nikon d3200 autofocuses reasonably well and this is confirmed by Live View.
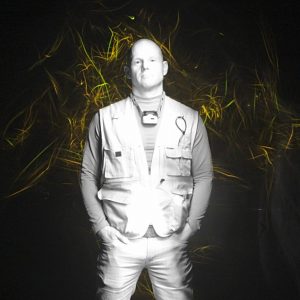
Just as the autofocus, the exposure measurement doesn’t work on infrared light. The image above I recorded in the mode “A” with an exposure correction of -3EV. This does not matter for the actual purpose of Light Painting. As “focus aid” I will simply write a kind of conversion table for all used lenses. At a focal length of 50 mm, the focus is on the infrared light at 2.2 meters when the camera focuses on the visible light at 2 meters.
Another problem is that the D70 has no connection for a remote trigger. The only option is to use an infrared remote trigger. Not the best option since the camera has been modified to infrared. I do not want to finally make the light painting with the remote control. In the “bulb” mode, the exposure starts at first hit the remote trigger and ends when you press the second time. So the “workaround” we had to do is: cover the lens, start the exposure, uncover the lens, make the light painting, cover the lens again, stop exposure. Thus the light of the remote control is not visible in the picture.
Step 3:
On a full-spectrum camera do I need an infrared filter, ie a filter that blocks the visible light, for the lens? And if so what?
Our Berlin studio is completely dark, the walls and floor are black. The camera only takes the light I turn on during the exposure. If I use only an infrared flashlight, the camera only captures the infrared light. But that doesn’t work so good because the infrared light of the flashlight is not visible to the human eye. I would work completely blindly.
The better way is to screw an IR filter in front of the lens. This lets only infrared light through and blocks the spectrum of visible light. With the screwed-on filter, I can switch on as much light without infrared as I want (specifically green, Dan discovered this accidentally!), and the camera does not record this. With the help of the green light, I can orient myself at least during the light painting in the room and recognize in which direction I light with the infrared lamp. Infrared filters are available in different versions. Common wavelengths from which the light is transmitted are 700, 720, 760, 850 and 950 nM. Most IR flashlights have a wavelength of 850 nM. For the light of the flashlight to be visible in the picture, the filter should let 850 nM in any case. I have opted for a filter with 720 nM. Many of the lenses I use have a 77 mm filter thread, so I bought a screw filter in this size. Angular IR filters for racking systems I have not found, but this does not mean that these are not actually manufactured. Alternatively, a piece of exposed, developed negative film can be misused as an IR filter. A cut piece of 36 mm small film can be fixed well in front of the sensor. 6×6 or larger roll film also fits most lenses. The material should definitely be absolutely smooth and error free.
Step 4:
The flashlight (s).
I had no idea how much power is needed for our purposes. I found torches with indications like 800 lumens, 3 watts or similar. Is it possible to measure the luminous flux (correct) for infrared? For testing, I have ordered a torch with supposedly 3 watts for 13 €, powered by an AA battery.
Then it occurred that my friends Heinz-Jörg and Garry from EMD installed in many different flashlights many different LED’s, UV, Golden Amber or those with considerably greater brightness than the manufacturer. So I called Wurzi and asked if he could convert a Led Lenser M7 or P7 to IR. I knew before that he loves such challenges. 😉 After a brief hint for what I want to use the flashlight and what it is to do, he agreed to modify a flashlight for me
.
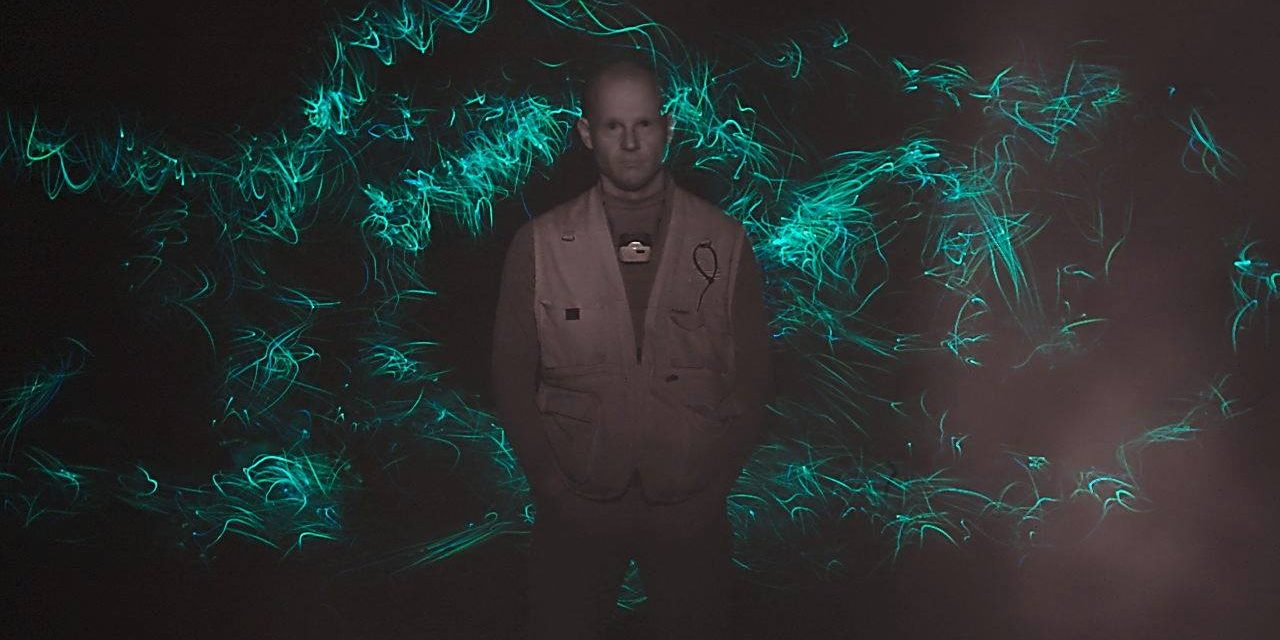
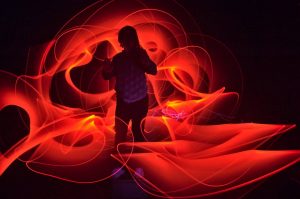
The recordings above we have made with the 13 € lamp. The thing is brutally bright. At aperture 11 Marla had directed the lamp in the picture on the left at a distance of about 2 meters about 2 seconds on Gunnar. Some pieces have already burnt out. In the other picture, we have illuminated from a far distance (5 meters) with the IR flashlight.
Both recordings were made with aperture 11 at ISO 200 with the Tokina 19-35 / 4 at 24 mm. ISO 200 is the smallest ISO value of the Nikon D70, with ISO 100 the results would be much better. The image quality of my first DSLR of 2003 is already miserable for today’s conditions. Especially the strong picture noise with long exposure times is very disturbing, even the noise reduction doesn’t help much. At 20 °C and more than 60 seconds exposure time, the image is usually no longer usable from the noise.
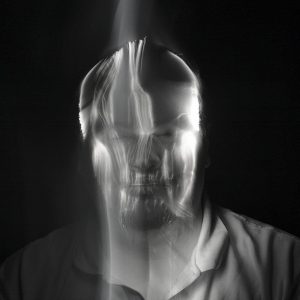
Another challenge is the adjustment of white balance in infrared light painting. I wanted Gunnar to have no color in the finished picture. So I have in the pictures above in image processing the white balance corrected to the infrared light is white. Unfortunately, the D70 does not have the possibility to set the determined value of about 4400k. Only prescriptions such as sun, shadow, artificial light etc. are possible.
However, the shift of the white balance to the infrared light has the effect that the other colors are no longer displayed correctly. In the picture on the right side the light painting was done with strong blue. In the left picture with a strong orange
. 
In the picture above, I attached the IR flashlight to a bundle of black glass fibers. This I moved pretty fast over the face of my model Matti. The flashlight was not turned on for more than 3 seconds. Again, some pieces burnt out. The focal length was 35 millimeters here, the distance from camera to model was about 1.5 meters. I photographed with aperture 13 and ISO 200.
With a longer focal length, the result would probably be better as the distance between camera and light would be longer. The infrared light would not burn out so quickly.
We certainly need some more time and many tests to get really good results. But this technique is exciting for us, especially the possibility to combine the infrared black and white look with normal light painting with colors.
 Above all, we still have to gain experience which material infrared light strongly reflects and which is not. This can not be judged by the color of the material.
In the picture on the left, Erik was completely dressed in black. As you can see the trousers in the picture are black, the shoes are white and the jacket is gray.
You can check this video of Dan Chick’s talk about infrared on the LPWA Rome meetup
Available Light – Light Painting with Infrared and Full-Spectrum Photography from Dan Chick on Vimeo.
Here are some more link to the materials I used for this modification:
Nikon D70 (used)
Static-free gloves
IR-Filter 720nm 77mm
Black fibers
Thanks for reading! Hope you might find that useful
