


Behind the scenes – Studio process

Behind the scenes – Studio process
In the video, you see the whole process of approximately three months, squeezed into two minutes.
Let yourself go
Often when I’m working at the studio I have a certain idea of what I want to create, but in the end come up with something completely different. I like working with an open mind and try to go with the new ideas the work might bring during the process. Letting yourself go from the original idea and developing it further, where the art work wants to go, is a very rewarding process even if the work itself won’t work out at all! Surrending totally to the process of making art, is like a trip inside yourself and a great adventure.
I must say I truly enjoy the moments in my studio, completely in my own world, mesmerized by the music and the art I’m creating. The act of creating is in my opinion the reward of making art, not the artistic outcome, which is the catalyte for the process itself. But more than anything, giving yourself the permission to try, to fail and to loose yourself into what you do is a very great gift to give yourself!
Open your mind to new ideas
As in life in general, the problems seem to solve better if you can look at them from another prespective. The same thing applies to art too, so when you’re taking the tenth version of a photo that just won’t work out, you might want to consider what could be done differently instead of repeating the same pattern.
Always when I have the chance, I like to do collaborations. Whether it be with my kids or fellow artists, you’re sure that what you were doing won’t go into the same direction after that! Even just talking about your work, or art in general, with your friends or colleagues could be a source for something new to try.
Studio process
Below is a birth process of how seven of my latest light paintings have been created and how they relate to each other. I first created the light painted version of John Millais’ Pre-Raphaelite classic, Ophelia, after seeing it in an art book at my oil color painting class while on a coffee break. The source for new inspiration can be found anywhere and come very sudden, and also lead to many new pieces of art in the process. So don’t be afraid of creative blocks, they come and go, as do sources of inspirations too!
Below is how the process works for me, hope you’ll find ispiration from it and find something to build your own way too!
How ideas lead to each other:
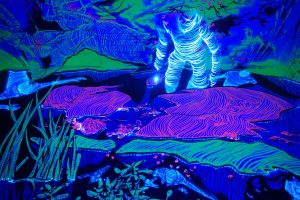
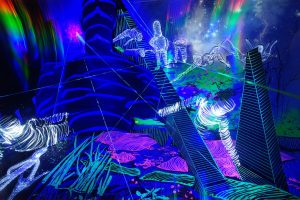
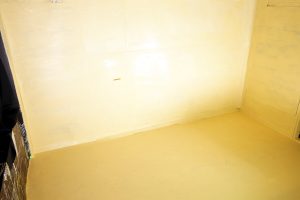
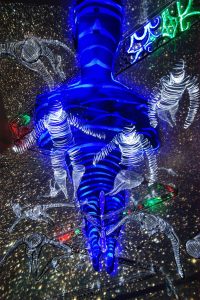
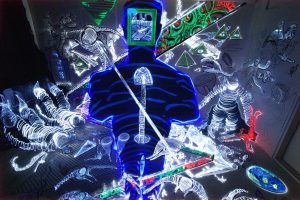
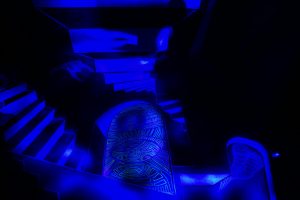
The Ophelia photo was done by painting the studio completely white and then drawing the forced perspective drawing with black and neon colored paint markers. The drawing was then lit with a rgb uv-light and the light figure was drawn to the correct place with a white led light.
Exposure 634 seconds, f14, ISO100.
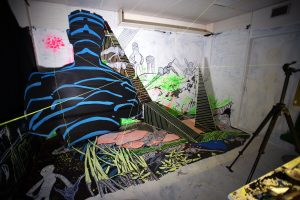
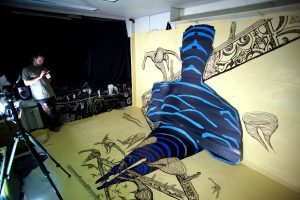
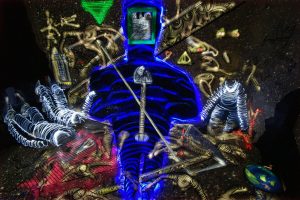
After the Ophelia photo was ready I felt I still wanted to see where the drawing would go if I just started improvising something on it. I found an old installation figure I had done previously as a commissioned work to a rave in an old factory so I nailed it on the wall.
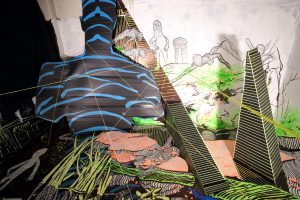
To get a more abstract feeling to the drawing I decided to try to add more three-dimensional parts to it. I placed old installation parts from my previous work and continued them into the drawing using forced perspective drawings. I also added some strings I painted with neon colors so I could create an effect of laser beams coming from behind the figure.
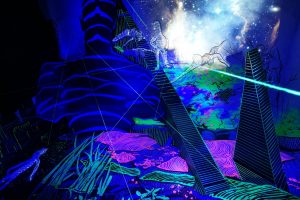
The whole drawing was then lit with an RGB UV-light. I placed a projector to my studio’s ceiling so I could get the space view projected as big as possible.
In the final version, I drew the light characters while a diffraction gel taped on the camera’s objective and then lit the scene without the gel. The characters drawn on the wall with markers were lit up carefully with a small led light.
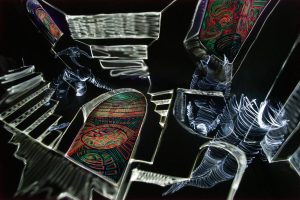
I wanted to continue the improvisation process without it starting to get too repetitive so I decided to cover the whole drawing and take the theme to a whole new level.
For the background I used a different color to see how it would react with the light painting.
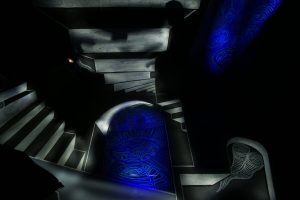
The rave installation figure seemed to have still potential for new ideas so I placed it on the wall and continued it with a drawing so that it would seem like disappearing inside the floor. I then collaborated the background with artists Ville Olaskari and Lauri Lauren with whom we came up with the idea of staircase covered in graffitis around the figure.
In the final version I projected space images to the wall and continued the lit up marker drawings with a white led light. The big figure is lit with Led Lenser rgbw flashlight.
Exposure 1171 seconds, f13, ISO100.
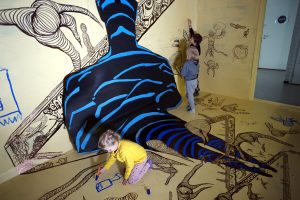
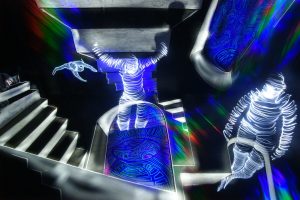
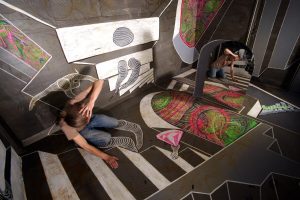
I wasn’t totally happy with the light painting since the staircase seemed to disappear into the background so instead of taking another version I decided to take the idea even further and add more stairs and details into it. I asked my children to decorate the scene with what ever they wanted in order to get more psychedelic vibe into the drawing.
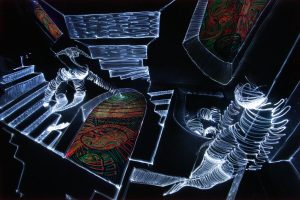
Since the staircase idea reminded me of M.C.Escher’s work, I thought I’ll add even more his style to it as an tribute to his work.
My first idea was to make the light painting with the rgb uv-light again, but to avoid being repetitive I wanted to try something else instead.
In this version I was happy how the staircase looked like, but was annoyed how much the physical shape of the studio was shown in it. This is a big problem while working with the forced perspective drawings; too much ligt will ruin the illusion.
In the final version I used much more pointing light from a close distance to lit up the drawings (and with more yellowish color tone) in order to hide the room’s physical shape better. The light figures coming out from the drawings were drawn with white colored led light.
Exposure 1499 seconds, f20, ISO100.
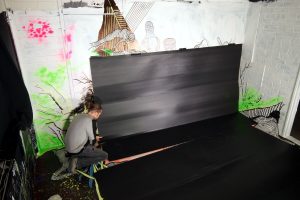
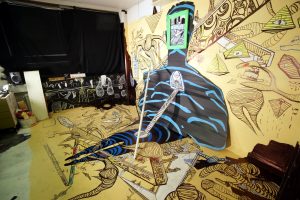
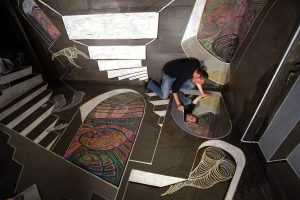
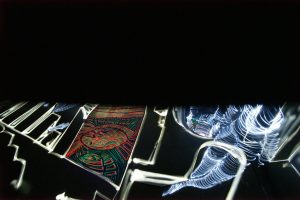
For my next idea I wanted to start again from the blank canvas, so I painted the studio again, this time with dark grey color.
Inspired by the M.C.Escher’s drawings I copied to the previous light painting, I wanted to try how it would work to create a whole infinite staircase light painting into my studio.
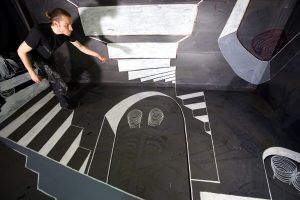
To get more illusion of space I painted some of the areas in the drawing white, so they would pop out nicely when lit. The drawing itself is a free improvisation, influenced by M.C.Escher’s work.
The nice thing with forced perspective drawings is that they look even more intriguing if you look them from the “wrong” point of you.
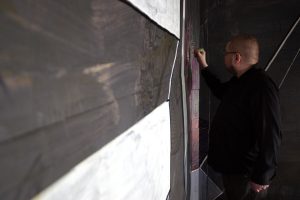
Since an artist friend of mine, Jussi Kekkonen was visiting me I asked him to draw psychedelic forms inside some of the doors in the set up.
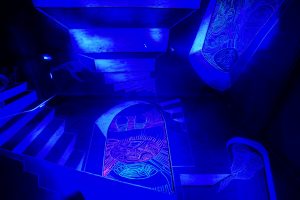
Test lighting for the light painting. The rgb uv-light from one direction over exposes the drawings totally.
Jannis Sid, who was helping me with the lighting came up with an idea to try Lightpaintingbrushe’s Universal Connector, with good results. The Universal Connector very efficiently creates a sharp light beam for the lighting.
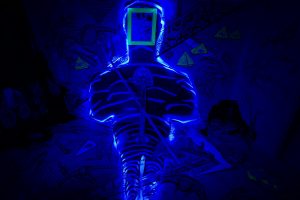
In order to create more depth to the photo I decided to use the blue light only for the psychedelic parts of the drawing and white light for the other parts.
In the final version I also added the diffraction gel effect for the lightmen and then lit up the drawings with the Universal Connector.
Exposure: 517 seconds, f14, ISO100.
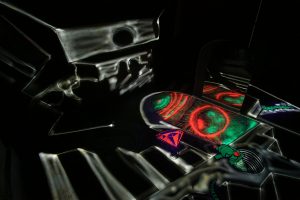
Since I really liked the infinite staircase idea I wanted to see how much further I could take it. When I found a mirror from my apartment’s trash bin that looked exactly like the gates in my drawing, I took it to my studio and made it as a new portal to the drawing.
In this test shot I wanted to see how a small led would work for lighting up the drawings. I also tried a neutral colored uv-light in order to get the colors from the drawing to look brighter.
In the testing phase I encountered a problem how to get a light figure to be shown only in the mirror portal and not over it. I tested the idea of having half of the camera’s view blocked with a piece of black cardboard in front of the camera’s objective, but with depressing results. I had forgotten the cardboard for the whole exposure in front of the camera! 20 mintes of work in vain is never a motivating thing when you’re still at the studio at 2 am.
In the final version I was happy with the ghostly looking lighman watching it’s reflection in the mirror portal, but was still curious what else could be done with the mirror.
Exposure: 1329 seconds, f13, ISO100
For the third version of the infinite staircase I added new details to the drawing and continued Jussi’s psychedelic drawings with more color and detail.
I placed the mirror into a different position and composed the photo from a “wrong” angle of the drawing’s perspective.

Testing the light figures positions in the photo.
With the improved colors and the neutral uv-light, the pyschedelic drawings started to work very nice.

In the final version I was happy with how the mirror creates surreal feeling into the already psychedelic looking atmosphere. Exposure 1469 seconds, f16, ISO100.
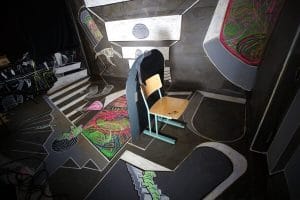
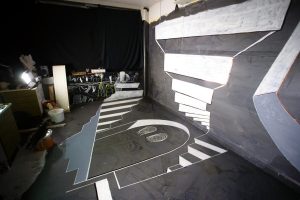
The studio set up for the third infinite staircase photo.
If you want to see the process in my studio that lead to the Ophelia image (the first one in this post), click on the video below:

