


Colours in Light Painting Part 4

Coloured light in Light Painting – practical implementation
After the first three more theoretical and philosophical parts of the article, this part deals with the practical uses of colour in our Light Painting pictures. What possibilities do we have for creating coloured light trails in a picture? How do we illuminate a room in colour?
You can find the first three parts of this article here:
colours-in-light-painting-part-1
colours-in-light-painting-part-2
colours-in-light-painting-part-3

Light Painting with colour gels
Probably the most commonly used method in light painting to “colour” light is the use of colour filter films or “gels”. These films are available in many different colours, they are heat resistant and they are relatively inexpensive. We usually buy films from LEE filters – the films are quite expensive compared with others, but they have clean, well-defined colours which means if I buy a new roll of “Tokyo Blue” after 3 years, I can be absolutely certain that the colour will be absolutely identical to the previous roll. This is not the case with many inexpensive films as the colour is not specified so precisely. They may simply be designated as “red” or “blue”.
Whichever film you choose, you should make sure that it is designed for lighting purposes (i.e. for flashlights). The fun, colourful handicraft foil from the bargain shop tends to set on fire pretty quickly when placed in front of a 2000 lumen flashlight!

How do you attach the colour foil to the flashlight?
For the Led Lenser X21, this is relatively easy. We simply cut round pieces of the foils, the same size as the head of the flashlight and then clamp them firmly against the flashlight using the roll-away protector.

Unfortunately, this is not so easy with most of the other flashlights we use. For the connection between the flashlight and whatever light tool we are using, we mostly use the Universal Connector from Jason Page. 20€ for a piece of rubber is far from a bargain, but so far we have not been able to find an alternative. In this case, to add colour to the tool we are using, we simply put one, or sometimes several, pieces of foil into the connector between the flashlight and light tool.
Another good solution are the connectors from Light Painting Paradise. Round and square connectors with matching colour filters are available.

Coloured Light Painting Brushes
An alternative to using colour gels between the flashlight and light painting tool is to use light painting tools which are, themselves, already coloured. In this case, you simply need to attach a white flashlight and away you go.
The obvious disadvantage of this approach is that, of course, you now have to pack five different coloured tools if you want to paint five different colours. This takes up a lot more space in the backpack than one tool and five small pieces of foil.
With this approach, you can however apply different colours to different parts of the tool or stick different colour foils on the outside to create multi-coloured tools.
All the tools shown below are very cheap and to be honest, such things tend to end up in the garbage! Just keep your eyes open and, if in doubt, attach it to a flashlight to see whether it will make a good new light painting brush.


Flashlights with coloured LED’s
In my opinion, the best solution for creating coloured light is to emit the light in the desired colour in the first place, rather than “colouring” it with a filter. Whereas a coloured LED solely emits light at the desired frequency, a filter takes white light and simply blocks all wavelengths except for the desired colour.
The result of this is that coloured filters can decrease the intensity of the light, and the strength of the reduction in intensity depends on the colour selected. A bright orange filter will absorb about 20% of the incident light whereas a dark blue may block as much as 80%. Due to this effect, the 3000 lumens produced by the LED Lenser X21R.2 become 2400 lumens when passed through an orange filter and only 600 if passed through a blue filter.
This causes problems when working with colour gels as, if I want to use both orange and blue in the same image, I need to remember that they will have different intensities and as such I will have to illuminate much longer with the blue filter than with the orange.

The LEDs in the flashlights in the above picture are identical in performance. All of the colours have a luminous flux of approximately 900 lumens and will therefore show up in the finished light painting with equal intensity. Although this is extremely convenient, the disadvantage of this approach is that the number of available colours is limited.
Currently, coloured LEDs are available in red, green, blue, violet, light blue and orange. Yellow LEDs are often offered as well, but technically they are identical to the orange LEDs with a slightly higher brightness. As such, if I want to produce yellow light in my picture, I can just let the orange light expose for a little longer – I don’t need another flashlight for that!
The main problem with this approach is that you can’t buy coloured flashlights like this – or at least if you can, I don’t know where to buy them. I built the flashlights above myself.


RGB Flashlights
As you can see in the example picture, it is possible to purchase flashlights than can output multiple colours with easy colour changing and even colour change modes. Unfortunately, they tend to be of very poor quality and hard to get hold of. Equally the battery life tends to be very short and when the batteries start to run out they have a tendency to change colour of their own accord. Finally, due to poor quality control, two identical flashlights will not necessarily represent mixed colours in the same way.
The way these flashlights work is through pulse width modulation. With mixed colours (i.e. not pure colours such as red, green or blue) the final colour is created by rapidly switching between the individual components which make up that colour – for example, red and blue to create purple. This effect is convincing when the flashlight is stationary, but if the flashlight moves sufficiently fast, the camera will see the PWM effect below.

In the zoomed in area of the image, you can see this PWM effect clearly and I didn’t even need to spin the orb very fast. Of course, this effect can be used consciously to create interesting effects but the key point is that clean and even colours are often difficult to achieve with these flashlights.
The final downside is the relatively low brightness of these flashlights which makes them unsuitable for illuminating larger areas.
Until recently, these RGB flashlights were available from Amazon or Pearl but presumably hardly anyone bought them as the only current source I know of is Aliexpress. This will be shipped from China and under certain circumstances may require a visit to your local customs office and the payment of import taxes.

Further possibilities
As well as the possibilities mention above for bringing colour into Light Painting, there are all sorts of other options: You can paint Light Blades made of Plexiglas by colouring the edges with coloured markers or paint, or you can stick coloured paper to them – this also works with other light tools such as PET bottles. Lighting up and then moving coloured, non-transparent objects and materials is, in some cases, also a good method to paint light traces into a picture. Indirect Light Painting so to speak.
Another possibility is coloured light sources such as EL-Wire. These thin light tubes are not expensive and are available in many colours and lengths. However, the disadvantages of EL-Wire are that they are not particularly bright and break easily.
In contrast, coloured fireworks are very bright. Fountains, volcanoes, Roman candles and coloured flares can be used well in light painting.
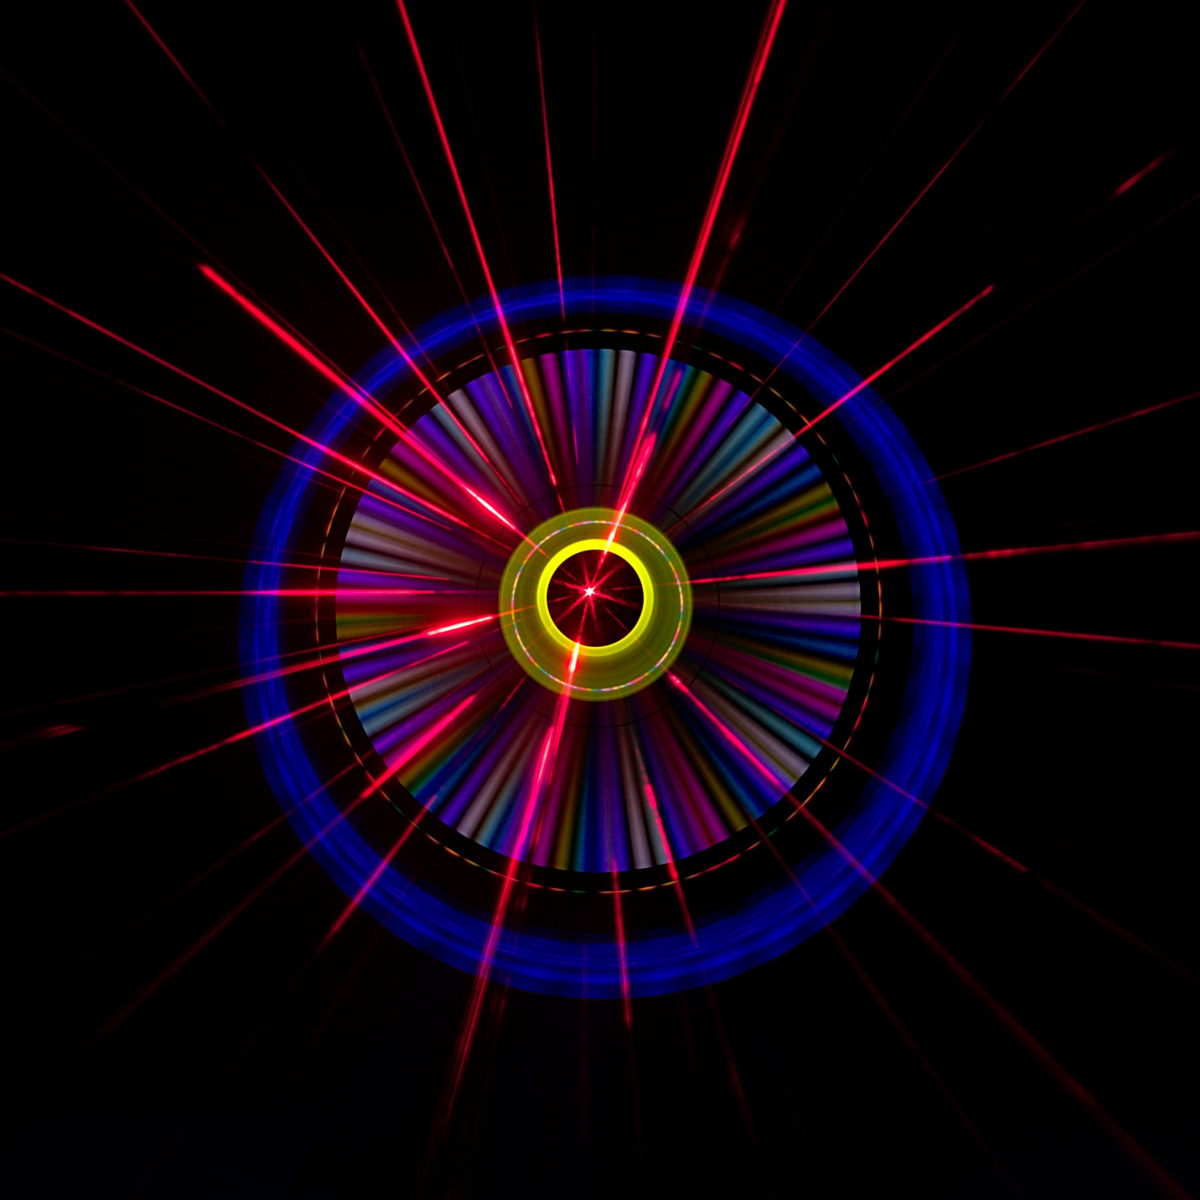
Last, but not least, lasers should not go unmentioned. Powerful lasers are anything but toys and certain impressive effects, such as in the accompanying picture, can only be achieved with lasers.
As ever, I wish I wish you all good light and may the fun of light painting never pass you by.
Sven
A huge thanks to Tom Hill for helping with the translation.
For a german version of this post follow the link
