


Camera Rotation
Hello and welcome to my next installment here for the blog and this time we’ll be looking at camera rotation. We’ll walk you through some aspects of this growing sub-genre of lp. Then with a little imagination and the right tool, you’ll be creating images which will make people scratch their heads in amazement at the mind bending craziness you create.

In The Beginning
I first became aware of camera rotation whilst looking at the incredible work of TCB and LED Eddie on Flickr. I couldn’t quite get my head around how they were achieving some of their shots. It looked like a mirror was being used but the perspective was flipped. After a bit of research and head scratching I came to the conclusion that the camera was being flipped mid-exposure and there were no mirrors involved.
The Tool
For those completely new to this type of thing a crt is a tool upon which you mount your camera. The pivot point is exactly in line with the center point of your camera’s sensor and the whole thing is mounted upon a tripod. It allows you to rotate the camera during a long exposure. Creating shots which twist reality. The effects from which still surprise me to this day.
I made my first camera rotation tool using some right angle brackets from a hardware shop. It was flimsy, not at all accurate and needed building every time I went out….Not Ideal, but still sparked my imagination with the host of possibilities now opened up. Then Chris Thompson and his brother Alan created the awesome Thompson CRT which is the tool I still use today to create my camera rotation shots. It’s the first tool which gets packed in my kit bag. I love it.
Sadly, the Thompson CRT is no longer available. But I’ll post some links at the end of this post for an off the shelf tool (the Beike gimbal). Or a modular one which can be built from various parts found on the internet, created by Juls Boo.
The Set Up
Calibrating your crt is where you’ll need to begin. If the pivot point is too high or low, or your camera isn’t mounted in a straight line, you’ll end up with non-symmetrical egg shaped shots. To calibrate I find a right angle corner and place that on the middle of my frame in landscape orientation. Using the grid function in live view to make sure it is centered. Next, rotate the camera 180 degrees and check that the point of the corner still lies in the center of the frame. If this is not the case then you’ll need to pan your camera to halve the distance back towards the center then repeat. Next do the same in portrait orientation, this time if the center point has moved you’ll need to adjust the pivot point up or down, again halving the distance.
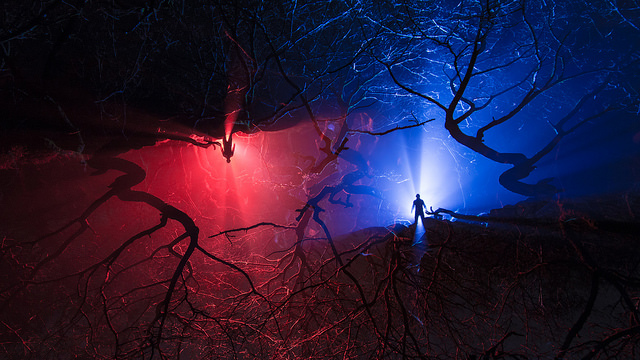
Dead Space And Controlling The Light
For the shot above I wanted to fill opposing thirds with my subject. I started by composing with the subject on the bottom right hand third. I had angled the lighting so as not to illuminate the top left hand third at all. This ensures after a 180 degree camera flip, the silhouette will remain black with no ghosting. Chris fired the shutter after I took up position (bottom right third) back-lit by a red gelled Led Lenser X21r.2. This illuminated the fog behind me creating the first silhouette. After 10 or so seconds Chris replaced the lens cap, he then rotated the camera 180 degrees and I changed the gel to blue, I took up position again before he took the lens cap off again for a further 10 seconds. Job done.

Frame Filling Goodness
More increasingly nowadays I have not been using camera rotation for the main effect but to fill parts of the frame which were dull. In the shot to the left I wanted to try my hand at levitation. The shot looked quite cool with just a back-lit figure but lacked interest around the edges. I took my light painting brushes black fibers and stuck them to my light stand, reasonably close to the bottom left of lens for some bokeh. I then rotated the camera 8 times to fill the entire outer frame with this effect. Instantly adding another element of interest giving a sense of depth and energy. Like an explosion had just happened.

Evolution
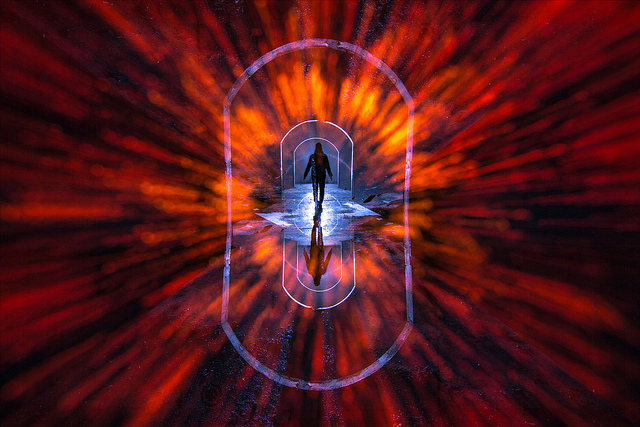
This shot was based on the first shot I talked about above. Although I loved the overall effect of that image, after considerable viewing I decided that there was too much dead space around the edge of the frame. Using a 180 degree flip of the camera as before, followed by a tripod swap and an 8 way rotation of the black fibers. I also added the lens flare, linking the two figures together. The outer starbursts again adding more depth and interest which draws the viewer into the image.

Covert Rotation
You’d probably look at this image and wouldn’t even know camera rotation was used. The first iteration of this shot needed a little something extra. I decided to add a blast of energy from the fireball in the middle. This was achieved using camera rotation of the black fibers gelled orange. A four way rotation this time, but zoom puling the bokeh after each rotation to make it look as if energy was radiating from between Lauren’s hands. A small touch but one that makes the image more engaging to look at.
Cover Every Angle
For shots where symmetry is desired (see below) then you’ll need a clinometer or angle gauge. There are plenty of apps out there which will allow you to accurately measure the angle at which your camera is pointing using your smartphone. There is a hot shoe mountable clamp which will hold your phone steady and show you your desired angles. I find doing these very relaxing as I have to concentrate really hard to remember which angles I need to hit.


 Free Spin
 Free Spin
I use the lens cap trick in many of my camera rotation shots but not always. One area to explore is rotating the camera whilst the cap is off. This can yield some really awesome and unexpected results. I was really happy with how this one came out as I loved how the light interacts with itself.
Those are the basics and hopefully they will provide you with a platform to work from. The best way to learn is to get your camera out of it’s bag and give it a try.
Cheers for reading and here are those links.
Beike Gimbal BK-45 can be found here
Juls Boo’s beautiful rotation creation – Can be found in the discussion section section of the camera rotation group linked below.
Camera Rotation group on Facebook
You can check out my previous tutorials here
Thanks again and catch you next time.
Happy days.


